Asus’s ROG Ally SSD with its 512 GB storage is no doubt, impressive to say the least. But, if you are a gamer with an extensive library, it can only get you so far. Fortunately for you, ROG Ally’s SSD card is upgradeable, and here’s a step-by-step guide by The Phawx that provides you with a simple breakdown of the entire process.
But before we jump into the guide, what will you need?
1) A screwdriver and
2) A new SSD of course.
1) Upgrading ROG Ally SSD –
Precautions – Discharge the ROG Ally’s battery to 25% or below. Remove any microSD card from the SD slot.
Step 1 – Opening Up The ROG Ally Device –
- Remove The 6 screws –
Flip back your ROG Ally and place it down on a soft surface. See the 6 screws? Use a screwdriver and undo all the screws — 3 along the top row and 3 along the bottom. The middle screw in the bottom row is tinier than the other 5. Unless you want to go through the hassle of attempting various screwing combinations later on, make sure to keep track of the order in which you open up the screws.
- Access The Device Hardware –
Use a thin plastic sheet or plastic spudger tool to pry apart the top and bottom panels. Tip – Start with the crevice. It will be easier.
Set the bottom panel aside.

Step 2 – Removing The ROG Ally SSD
- Access The SSD –
For safety purposes, undo the cable first. You can do this easily, by pulling the battery connector out of its socket. Next, lift the black flap and you will find the SSD Underneath it.

- Sliding The SSD Out –
Use a screwdriver to remove the screw holding the SSD in place. Once that’s done, gently slide it out.
Step 3 – Secure The Replacement ROG Ally SSD –
Slide in the replacement SSD. Screw it in place with the help of your screwdriver.
Step 4 – Put Everything Back Together
Now the easy part.
- Plug in the battery connector.
- Connect the panels and snap the clips together to close your ROG Ally up.
- Screw the screws back into their respective spots.
Plug in the charger before you switch the device on. Great, so the ROG Ally SSD has been successfully upgraded. Let’s move on to the next process.
2) Reinstalling Windows On ROG Ally –
- Once the device is powered on, you will encounter an interface like this.

- Press “Y”. The top switch on the right side of ROG Ally.
- It will open up a screen like this.

- Go to “Advanced”.
- Then click on “ASUS Cloud Recovery”.
- It will take you to the ASUS Privacy Policy.

- Click on “View Policy”.
- Tick the “I am above the age of 20 years” box.
- And then tap on “Agree”.
- On the screen of your ROG Ally, you will see “Cloud Recovery”. Click on “Next [Enter]”.
- Since ROG Ally doesn’t have a wired network, it will show you an interface requesting WiFi access. Click on “Next [Enter]”

- A virtual keyboard will pop up along with a placeholder to type in the password. Enter your WiFi password on the screen.
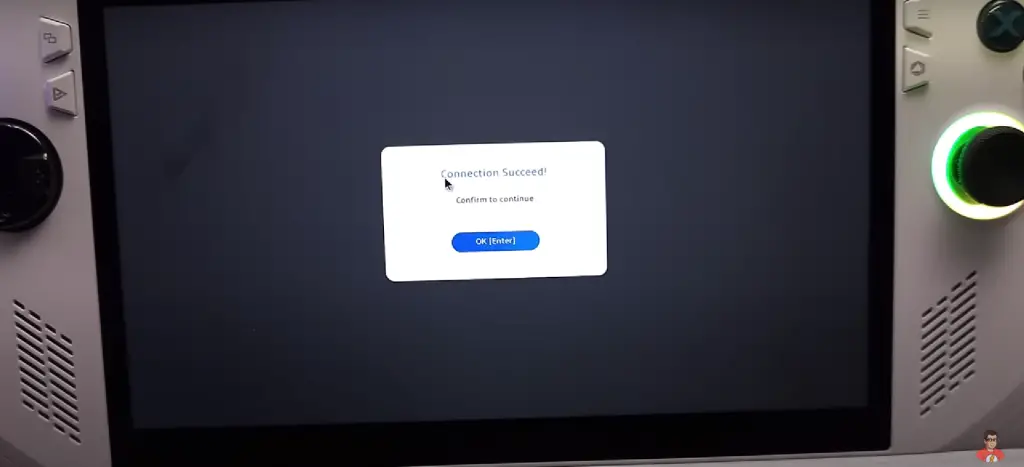
- Once that’s done, you will get a screen that says “Connection Succeed”. Click on “Ok [Enter].
- The cloud recovery will start immediately. It can take a few minutes.

- Keep the ROG Ally aside and plug it into a power outlet.
- Once the recovery is finished, you will see a “Confirm” button on the screen. Click on that.
- A loading screen will appear. Cloud recovery erases your previous data. And you will get a warning screen saying the same thing. But you are replacing your SSD anyways, so no need to worry about that. Just click on “Yes”.

- The installing page will appear. This part is automatic. Which means all you have to do is to wait. Note that, you will encounter some pop-ups but don’t touch the screen or click on any button.
- After the process is over, you will get the interface to sign in to your device and customize your windows.
- You will also get a screen to set up your fingerprint.
Congrats you have successfully upgraded your ROG Ally SSD and reinstalled Windows 11.
Lastly, one last check just to be sure.
- Click on the “files” icon.
- Click on “This PC” and you will be able to check the storage.

And there you go. So, the SSD upgradation was indeed successful and now you have your preferred storage space.